

\n
Last updated: July 3, 2026
\n
The article:write skill is designed for drafting new articles from scratch. This task is a polish/expansion of an existing article – I’ll work directly from the reviewer feedback.
\n
 \n
\n
\nImage: Unique Photo / Shutterbug
\n
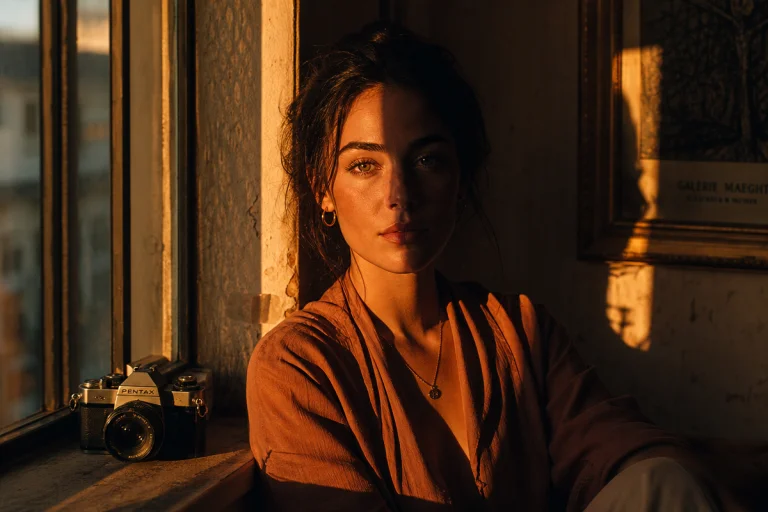
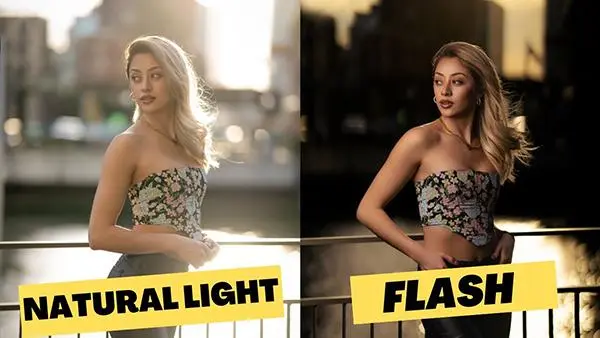
Picture this: late afternoon, a subject standing near a north-facing window, light falling across one cheekbone in a clean diagonal plane. The shadow side of the face gradates into darkness, the background a soft ambient wash. It is beautiful. It is legible. And for thousands of photographers at every level of experience, that window is where the love affair with portrait lighting techniques begins.
\n
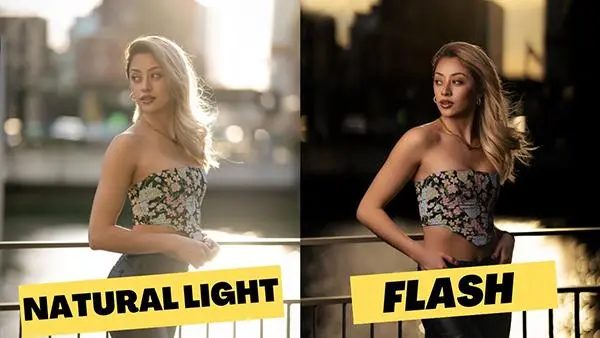
But picture something else. The same subject, three metres from that window, moved outdoors into open shade – a single off-camera strobe firing through a 60cm softbox positioned forty-five degrees to their left. The highlights have edges now. The shadows are sculpted rather than found. The background, still lit by ambient sky, sits two stops behind the subject. This is a different conversation entirely, and learning to move between these two worlds is what separates reactive photography from intentional portrait-making.
\n
How We Learned to Read Light
\n
 \n
\n
\nImage: Unique Photo / Shutterbug
\n
Natural light is the foundation, and it teaches us everything we need before we ever touch a flash unit. Photographers have relied on available light since the daguerreotype era – think of Julia Margaret Cameron’s window-lit Victorian portraits, where soft north-facing light produced tonal gradations that painters of the period openly envied. Yousuf Karsh, working in Ottawa through the mid-twentieth century, extended that same window logic into a controlled studio: his sitters, lit by a single soft key source with gentle fill from the opposite side, carry a sculptural weight that owes everything to his understanding of natural light ratios. Those same principles govern portrait photography today, whether we are working with a medium-format digital back or a phone camera pressed up against a kitchen window.
\n
The first lesson natural light teaches is direction. Light from one side creates dimension; light from directly behind the camera flattens the face into a passport photograph. Light positioned above the subject produces unflattering shadows beneath the eyes and nose. These are not stylistic preferences – they are structural facts about how a three-dimensional face renders in a two-dimensional image. Before we reach for a flash, we should be able to stand in any room, look at the available sources, and predict precisely where every shadow will fall.
\n
The second lesson is quality. Hard light – the midday sun, a bare window receiving direct sunlight – produces crisp-edged shadows and punchy contrast. Soft light – open shade, an overcast sky, a window with diffusion film applied – wraps the subject and produces smooth tonal transitions across the face. Every modifier we will ever clamp onto an artificial light source is attempting to replicate one of these two natural conditions. Understanding the original makes working with imitations considerably more intuitive.
\n
The third lesson is colour temperature. Golden hour light sits at roughly 3,200-4,000 Kelvin [citation needed] – warm, amber-tinged, and intimate in mood. A north-facing window in daylight reads closer to 5,500-6,500K [citation needed]: neutral, clean, editorially cool. An overcast sky delivers a flat, even tone that minimises shadows and suits beauty work. Recognising these biases trains the eye to manage mixed sources later – to know, for instance, that a daylight-balanced flash will feel cold inside a room flooded with tungsten warmth, or that adding a CTO warming gel to the head will bring them into harmony.
\n
The Moment Flash Changes Everything
\n
The defining limitation of natural light is that we cannot move it. We can reposition the subject relative to the source, but the source itself is fixed – and outdoors, it is moving constantly, changing colour temperature and intensity as the day progresses. Off-camera flash solves this by placing a portable, consistent, controllable light source wherever the image requires it. This is the turning point: the transition from responding to light to actively building it.
\n
Central to this shift is the concept of lighting ratios – the intensity difference between the key light and the fill light. A 2:1 ratio, where the key side of the face receives twice the light of the shadow side, produces a contemporary, fashion-editorial quality. A 3:1 ratio approximates the classic portrait look. Push beyond 4:1 and we are in Rembrandt territory: deep shadows, a small triangle of light on the shadow cheek, unmistakable drama. Natural light produces these ratios accidentally. Flash lets us dial them in deliberately, repeat them consistently, and adjust them mid-session without waiting for a cloud to pass.
\n
The barrier to entry is lower than most photographers assume. A single strobe paired with a softbox, triggered via a radio-controlled remote system, is sufficient to produce fashion-quality portraits. Godox makes radio-controlled trigger and receiver systems that perform with real reliability at accessible price points – the trigger mounts in the camera’s hot shoe, the receiver attaches to the flash head, and we are free to position the light anywhere within range without tethering cables. The essential move is removing the flash from the camera. For outdoor portraiture in daylight, and for wedding or event work where ambient conditions shift continuously, flash tends to be the stronger choice over continuous lighting – it can overpower bright ambient light where continuous sources typically cannot.
\n
Portrait Lighting Techniques: A Structured Progression
\n
The encouraging truth is that the path from natural light to a multi-flash outdoor setup is a ladder, not a cliff. The steps are discrete, each one building directly on the last, and there is no obligation to hurry.
\n
Stage one: natural light and reflectors. Work exclusively with available sources for an extended period – weeks or months, not an afternoon. Learn to read the quality of light at different times of day, to position subjects relative to windows and doorways. Then introduce a reflector as your first piece of light-shaping equipment: a white reflector bounced opposite the window provides gentle fill that lifts shadow detail without disturbing the natural quality of the source. A silver reflector delivers punchier fill and retains more contrast; a gold reflector adds warmth, flattering in the cool neutrality of north-facing window light. Composition matters here too – the direction of the main light source should generally correspond with where the subject’s gaze leads. Light entering from camera-left with a subject turned toward that source creates immediate engagement; turn them away from it and the mood shifts toward something more contemplative. This stage is not a beginner’s consolation. Some of the most significant portrait work in contemporary photography is made entirely with natural light.
\n
Stage two: single off-camera flash. Introduce one flash unit as the key light, positioned at approximately 45 degrees to the subject and slightly above eye level – if the softbox had a gaze, it would look down toward the bridge of the nose. This geometry produces a loop or Rembrandt lighting pattern depending on exact placement and face angle, and it is the configuration worth living inside for months before adding a second unit.
\n
For camera settings outdoors: start at 1/200s (the standard flash sync speed for most DSLRs and mirrorless bodies), f/4, ISO 200. Take a test frame without firing the flash to assess ambient exposure. Stopping down to f/5.6 or f/8 underexposes the background by one or two stops, producing that characteristic separation between subject and sky. Bring the flash in at moderate power – 1/8 is a reasonable starting point – and adjust until the subject is correctly exposed. The ratio between flash and ambient is the primary creative tool: raise flash output or close the aperture to deepen subject-background separation; ease it back to let the sky reassert itself.
\n
For a simple first session: set up in open shade outdoors. Expose for ambient. Position the softbox 45 degrees to the subject’s left, slightly above eye level, at roughly arm’s length. Fire one test frame. Adjust flash power. Place a white reflector on the shadow side at roughly waist height and tilt it toward the face. Observe how the shadow ratio shifts. Work that single configuration for fifteen minutes before changing anything. Mastery of one setup is worth considerably more than surface familiarity with a dozen.
\n
Phone photography and the same principles. A phone camera follows identical laws of light – the only variable is the degree of manual control available. In the pro or manual mode offered by most current flagship phones, lock exposure on the subject’s face. If shooting in auto, long-press the face to lock focus and exposure together, then reframe. Shoot RAW if the phone supports it, then edit in Lightroom Mobile: raise shadows slightly, pull back highlights, and use the colour temperature slider to lean into or neutralise the warmth of the source. The geometry – direction, quality, ratio – is unchanged whether the camera cost £50 or £5,000. Golden hour through a west-facing window is as flattering on a phone as on a full-frame body.
\n
Stage three: dual-flash outdoor setups. A common configuration for outdoor portraiture pairs one flash in a softbox to complement and wrap the ambient sunlight around the subject, with a second strobe dedicated to fill or background separation. At this stage, the thinking shifts from lighting the face to lighting the entire three-dimensional scene. Subject pose, camera position, focal length, background distance, and flash placement all interact before the shutter opens. The image exists in the scene first; the camera records it second.
\n
Throughout all three stages, the decisions that determine the quality of a portrait happen before any exposure is made. Coordination of pose, camera configuration, and light source placement within the three-dimensional space is the real craft of portrait photography. If those choices are right, the shutter press is almost incidental.
\n
We return, at last, to that north-facing window. Late afternoon. Light falling in a clean diagonal across one cheekbone, shadow gradating across the face, the background a quiet ambient wash. That image remains beautiful. Understanding precisely why it is beautiful – the direction, the quality, the colour temperature, the implicit ratio between the lit side and the shadow side – is exactly what prepares us to recreate it anywhere, under any conditions, with whatever tools we have available.
\n
Portrait photography is not a competition between natural light and flash. It is a continuum of control. The window was the first teacher. The softbox is the next one. The work, at every stage, is learning to see what the light is doing – and then deciding whether to use it or build something better.
\n
Frequently Asked Questions
\n
Q: What are the most important portrait lighting techniques for beginners to learn first?\nA: Start with direction and quality of natural light – learn to read where shadows fall relative to the light source, and how hard versus soft light affects the mood of a portrait. These fundamentals transfer directly to artificial lighting, making the step to off-camera flash considerably more intuitive.
\n
Q: How many flash units do I need to start shooting with off-camera flash?\nA: One is sufficient. A single strobe paired with a softbox and a radio-controlled trigger can produce fashion-quality portraits, with ambient light serving as the fill source. A second flash becomes useful once you have thoroughly explored what a single unit can do.
\n
Q: What is a lighting ratio in portrait photography?\nA: A lighting ratio describes the intensity difference between the key light and the fill light. A 2:1 ratio produces subtle, even-toned results; a 3:1 ratio gives the classic portrait look; 4:1 and beyond produces dramatic, high-contrast results associated with Rembrandt-style portraiture. Controlling this ratio is the primary tool for shaping mood.
\n
Q: Why is flash generally preferred over continuous lighting for outdoor portraits?\nA: Flash output is powerful enough to overpower bright ambient daylight, and it fires at consistent power regardless of changing conditions – making it considerably more reliable for outdoor and event work than continuous lights, which can struggle to compete with sunlight and may vary throughout a shoot.
\n
Q: What is a good budget-friendly entry point for radio-controlled off-camera flash?\nA: Godox produces radio-controlled trigger and flash systems that are widely regarded as strong performers at accessible price points. A basic Godox trigger and a compatible flash head is a practical starting kit that supports the full range of single and multi-light portrait setups.
\n
\n
This article was researched and written with AI assistance, then reviewed for accuracy and quality. Talulah at Its.That. uses AI tools to help produce content faster while maintaining editorial standards.
\n