Last updated: April 17, 2026
Writing the article now based on the full brief provided.
Picture this: a woman sits by a rain-streaked window, the grey afternoon light falling soft and diffuse across her face. One eye is caught in a thin bar of brightness; the other recedes into shadow. She isn’t smiling. She is simply – present. That image, whether captured on a medium-format film camera or a recent-generation smartphone, is what portrait photography meaning comes down to: not documentation, but revelation.
This guide is about closing the gap between a technically correct portrait and one that actually stops a viewer mid-scroll. We’ll walk through each stage – from preparation and lighting through to editing – giving you a repeatable process that works whether you’re shooting in a studio or a cluttered kitchen.
Prerequisites – Tools, Knowledge, and Mindset
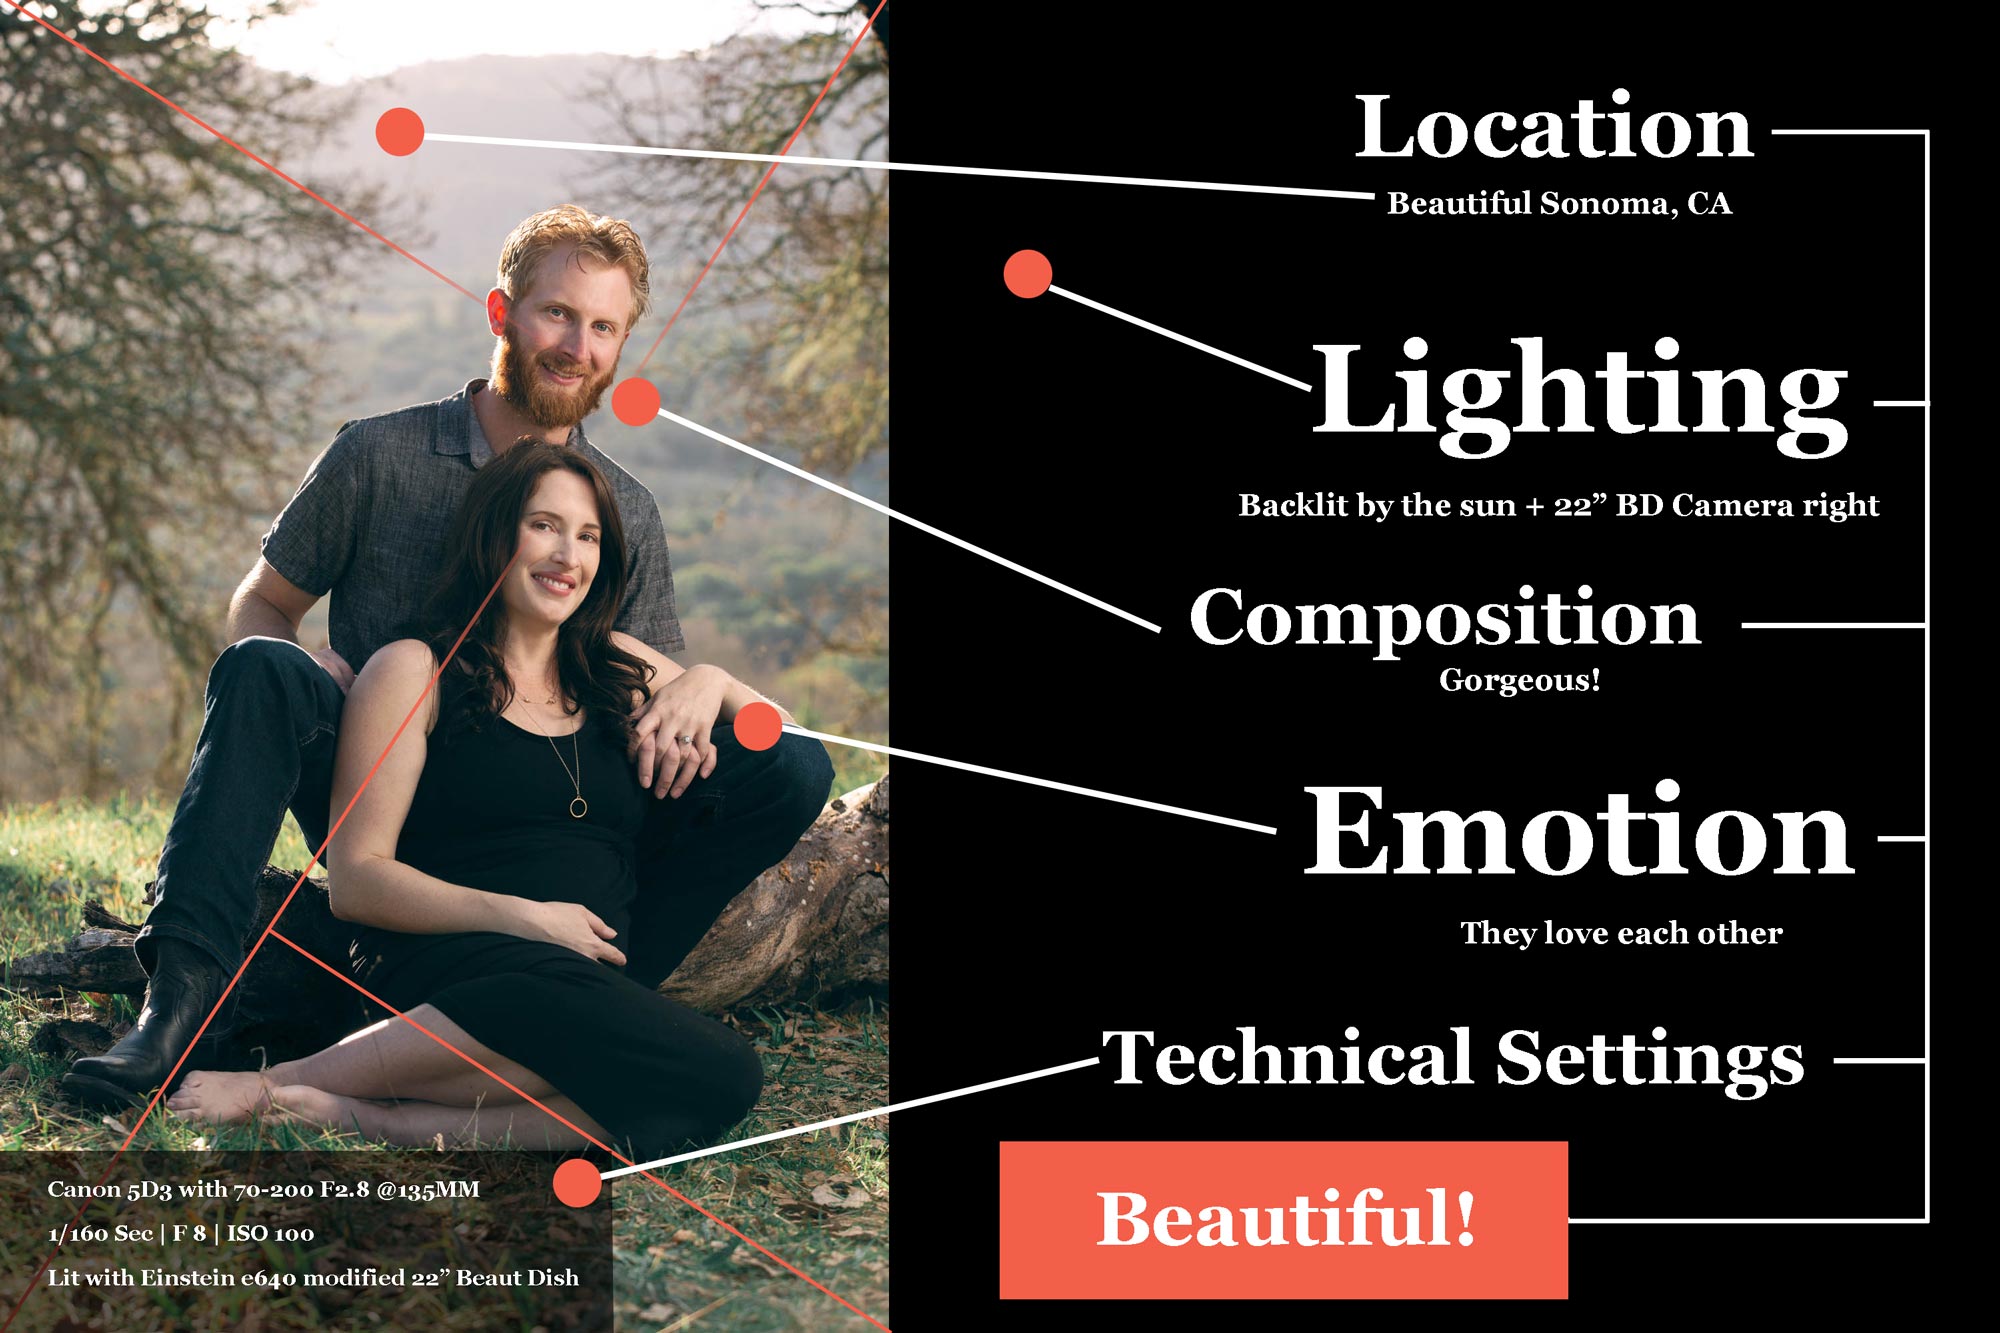
Image: jasonguyphotography.com
You don’t need a full studio kit to make great portraits. What you do need is a basic understanding of how light falls on a face, a willingness to communicate with your subject, and a camera capable of manual or semi-manual control – that includes most smartphones made in the last three years.
Recommended gear:
– Camera: any DSLR, mirrorless, or recent phone with portrait mode disabled (more on that later)
– Lens: 50mm or 85mm equivalent on full-frame; 35mm on crop sensor – these focal lengths avoid the facial distortion wide angles introduce
– Light source: natural window light, a single LED panel, or a speedlight bounced off a white wall
– Editing software: Lightroom Mobile (free tier), Snapseed, or desktop Lightroom/Capture One
Knowledge you’ll need: a basic grasp of exposure triangle (ISO, shutter speed, aperture) and comfort directing another person, even briefly.
Step 1 – Define the Emotional Territory Before You Pick Up a Camera
The most important decision in portrait-making happens before any shutter fires. Ask yourself: what do I want the viewer to feel when they look at this person?
The great portrait photographers – Yousuf Karsh, Dorothea Lange, Annie Leibovitz – all began with an emotional brief. Karsh’s 1941 portrait of Churchill [citation needed] works not because the lighting is perfect (though it is) but because Karsh removed the cigar from Churchill’s mouth moments before pressing the shutter, provoking that defiant, unyielding scowl. The technique served the intention. Start there.
Write one sentence describing the feeling before you set a single light. “Quiet resilience.” “Playful confidence.” “Grief held at arm’s length.” That sentence becomes your quality gate for every decision that follows.
Step 2 – Build Your Light
Good light does most of the work. Place your subject near a large north-facing window – the soft, indirect quality wraps around facial features without creating harsh shadows. This is Rembrandt lighting in its most accessible form, the same principle used by Dutch Golden Age painters: a single dominant source at roughly 45 degrees to the face, positioned slightly above eye level.
For beginners, a single-source setup is almost always preferable to multiple lights. Complexity in lighting usually produces complexity in shadow, and complexity in shadow often reads as confusion rather than drama.
Practical settings for window-light portraits:
– Aperture: f/1.8-f/2.8 (sharp eyes, softly blurred background)
– ISO: as low as the exposure allows – start at ISO 400 in typical indoor light
– Shutter speed: 1/125s minimum to avoid motion blur from natural breathing movement
– White balance: set manually to “Cloudy” indoors to preserve warm skin tones
If you’re working with artificial light, a single LED softbox at 45 degrees produces a nearly identical result. Keep the light source as large as possible relative to your subject – a large source close to the face gives beautifully gradual shadow falloff. This is why photographers often use umbrellas and octaboxes rather than bare bulbs.
Step 3 – Compose with Intention, Not Convention
The rule of thirds is a reasonable starting point and an uninspiring destination. Place your subject’s near eye – the eye closest to camera – on one of the upper intersecting points, and you’ll get a compositionally solid image. But the portraits we remember usually break that framework deliberately.
Consider what the empty space in your frame is doing. Space in front of a subject creates anticipation; space behind them suggests isolation or reflection. Shooting tight – filling the frame with just the face and shoulders – forces an intimacy that wider compositions avoid. The top photography trends for 2026 show a consistent move toward that tighter, more honest framing as audiences grow tired of over-produced imagery.
Turn off portrait mode on your phone. It applies algorithmic bokeh that flattens facial features and introduces artificial edge artefacts. Instead, move physically closer to your subject and let the natural perspective compression of the lens do the work.
Step 4 – Direct Your Subject
Most people freeze in front of a camera. Our job as the photographer-director is to give them something to do that releases that tension.
Rather than saying “look natural” – which produces the opposite – try giving a specific micro-instruction: “Look just past my left shoulder.” “Think about what you had for breakfast.” “Take one slow breath and hold it.” These instructions produce real expressions rather than performed ones because they give the brain something to process other than self-consciousness.
Picture this: you ask your subject to look down at their hands, wait three seconds, then look back up at you. The moment their eyes return to the lens is often the best frame of the sequence – a look of genuine arrival, unselfconscious and direct.
A brief historical aside here: Richard Avedon pioneered the technique of placing subjects against a plain white backdrop and then deliberately creating emotional friction – unexpected questions, uncomfortable silences – to strip away the social mask. His “In the American West” series remains one of the most powerful demonstrations that direction, not technical perfection, is the distinguishing variable.
Step 5 – Edit for Mood, Not Just Correction
The edit should deepen the emotional territory you defined in Step 1. Start with global corrections – exposure, white balance, basic contrast – then move to mood-shaping.
For a sense of intimacy and warmth: pull the highlights, lift the shadows slightly, and nudge the colour temperature warmer. For something cooler and more detached: push the blues in the shadows using split toning, and reduce saturation in the skin tones by 10-15 points.
Skin retouching is where most beginners over-edit. Pores, texture, and micro-shadows are what make a face human. Remove too much and the portrait becomes an illustration. Tools like the Healing Brush in Lightroom are best used conservatively – remove blemishes that are genuinely temporary, leave everything that is structurally part of the person’s face.
For those exploring AI-assisted stylisation in post-processing, frameworks like UniStyleDiff offer interesting possibilities for applying coherent visual styles across a portrait series without manual grading.
Troubleshooting – Common Pitfalls and Fixes
Problem: Eyes are sharp but the portrait feels flat.
Fix: The issue is usually emotional, not technical. Return to your sentence from Step 1 and ask whether the direction you gave in Step 4 actually served that intention. A technically perfect image with no emotional direction reads as a passport photo.
Problem: Skin tones look orange or grey in editing.
Fix: Set white balance manually at the time of shooting rather than relying on Auto. In editing, use the HSL panel to adjust hue and saturation specifically within the orange and red channels, which contain most skin tone information.
Problem: Background is distracting even with wide aperture.
Fix: Increase the physical distance between subject and background. Bokeh is a function of that separation, not just aperture. Moving your subject two metres further from the wall will blur the background far more effectively than opening the aperture another stop.
If you’re considering taking portrait work into commercial territory – brand campaigns, editorial shoots – understanding the economics involved is essential reading before you price your first job. The clothing brand photoshoot cost guide breaks down realistic production budgets that apply equally to portrait-forward fashion content.
The next level from here is learning how light quality changes across the day, how to build a two-light ratio setup for more controlled studio work, and how to develop a consistent visual signature across a body of work – the point at which portrait photography meaning shifts from craft to authorship.
Frequently Asked Questions
Q: What is the difference between a portrait and a photograph of a person?
A: A portrait captures something essential about the subject’s character or inner state, rather than simply recording their physical appearance. The intent is to reveal, not just document – which is why direction, light, and emotional preparation matter as much as technical settings.
Q: What focal length is best for portrait photography?
A: An 85mm lens (or 50-55mm on a crop-sensor camera) is the most widely recommended for portraits because it produces natural facial proportions without the distortion that wider angles introduce. On a smartphone, the 2x or 3x telephoto lens typically produces a more flattering perspective than the standard wide camera.
Q: How do I make a subject look relaxed in front of the camera?
A: Give them a specific, simple task to focus on rather than asking them to “look natural.” Micro-directions – where to look, what to think about, when to breathe – occupy the analytical brain and allow genuine expression to surface. Spending five minutes in conversation before raising the camera also significantly reduces tension.
Q: Do I need a studio to shoot professional-quality portraits?
A: No. A large window with soft, indirect daylight, a simple background (a plain wall or bedsheet), and the ability to control the room’s ambient light are sufficient for portraits indistinguishable from studio work. The quality and direction of light matter far more than the physical setting.
Q: What should I focus on when editing a portrait?
A: Prioritise mood over correction. Global adjustments to exposure and white balance first, then use colour grading (split toning or HSL adjustments) to reinforce the emotional tone of the image. Keep skin retouching minimal – texture and natural variation are what make a face believable and human.
Source: https://photo2painting.com/blog/what-is-a-portrait
This article was researched and written with AI assistance, then reviewed for accuracy and quality. Talulah Menser uses AI tools to help produce content faster while maintaining editorial standards.