Last updated: May 1, 2026
Picture this: a person sits in a pool of warm side light, one shoulder turned slightly toward the camera, eyes carrying something private and unspoken. The jaw is sharp, the skin reads as real – pores, texture, life. Their expression isn’t performing happiness. It’s doing something better. It’s telling the truth.
That is the portrait we are going to teach you to make. Not through expensive gear or elaborate setups, but through an understanding of the psychological and technical portrait photography techniques that separate a technically correct image from one that stops people mid-scroll. A portrait, at its core, is a negotiation between photographer and subject – and like any negotiation, trust is the foundation.
Prerequisites – tools, knowledge, and mindset

Image: Furoore
You need a camera (a phone with a decent sensor is a legitimate tool here), a willing subject, and a light source you can control or position. An 85mm lens is the portrait photographer’s classic choice for good reason – we will explain why shortly. A mirrorless or DSLR body helps, but it is not the barrier. Lightroom or Capture One will handle post-processing. Bring patience, a quiet presence, and the willingness to look slightly odd while you warm up your subject.
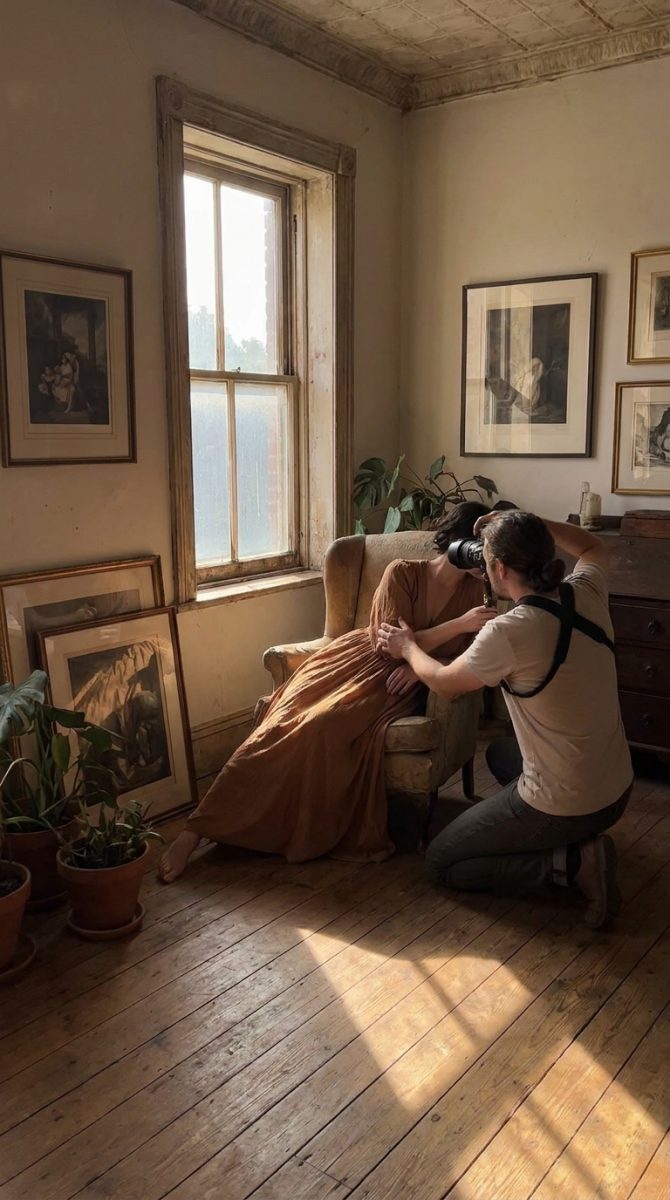
Step 1: Build the room before you pick up the camera
The first five minutes of a portrait session are not a warm-up – they are the shoot. The images you capture in minute twenty-five are only possible because of what happened in minute two.
Walk in calm. Move slowly. Put your camera down for a moment, make eye contact, and talk about something that has nothing to do with photography. Your body language is contagious. If you are tense and transactional, your subject will tighten. If you mirror their posture – leaning when they lean, tilting your head when they do – you are activating a subconscious mechanism. Research from Princeton University found that mirrored behaviour increases perceived social connection and comfort. We are not mimicking; we are tuning in.
Once conversation is flowing, pick up the camera and shoot a few frames you do not care about. Let the sound of the shutter become ordinary.
Step 2: Choose the right focal length for the face you are shooting
Focal length is one of the most misunderstood portrait photography techniques among beginners. Here is the myth: any lens will do as long as you crop right. Here is the reality: a 35mm lens shot at close range exaggerates facial features through barrel distortion – noses widen, foreheads push forward, proportions shift in ways the subject will feel self-conscious about. An 85mm lens forces you further from the subject, which compresses perspective, softens distortion, and flatters almost every face.
On a phone, use the 2x or 3x optical zoom rather than the wide default camera. Step back. Give the subject breathing room between you and the lens. The result reads as more natural even though it requires more physical space.
For settings: shoot at f/1.8 to f/2.8 to separate your subject from the background, keeping one eye in sharp focus. ISO as low as your light allows. Shutter speed above 1/160s to freeze micro-expressions.
Step 3: Light for dimension, not brightness
Flat, even light – the kind you get from an on-camera flash or bright overcast overhead – removes depth from a face. It is the visual equivalent of ironing out everything interesting. Side lighting and subtractive lighting are the tools that restore it.
Position your light source (window, reflector, softbox, a doorway) to one side of the subject’s face. Watch the shadow fall across the far cheekbone and down the neck. That shadow is not a problem to fix – it is the architecture of the image. Rembrandt portraits worked this way four centuries ago. So did Yousuf Karsh’s iconic photographs of Churchill and Hemingway. They understood that shadow defines form.
Subtractive lighting means using a black card or dark surface to absorb light from one side, deepening shadows rather than filling them. This increases contrast and gives portraits a more cinematic, intentional quality. Experiment with how far the shadow falls before it swallows detail – that edge is where the mood lives. Colour grading in post can extend this further, cooling shadows and warming midtones to give the final image its emotional register.
Step 4: Direct the body with specific, physical prompts
Posing direction fails when it is vague. “Look natural” produces a frozen, self-conscious result because the subject does not know what natural means on command. Give physical, precise instructions instead.
The single most effective posing note: ask your subject to bring their forehead slightly forward and down toward the camera. It feels awkward – almost like they are craning their neck. But this simple shift tightens the skin beneath the chin and defines the jawline in a way that no editing can replicate. Show them in a phone preview. They will do it willingly once they see the difference.
Turn the body at forty-five degrees to the camera rather than face-on. Drop the near shoulder. Weight on the back foot. These are not arbitrary rules – they create diagonal lines through the frame that draw the eye and give the subject presence without aggression.
Step 5: Unlock genuine expressions through memory, not instruction
This is where portrait photography techniques meet emotional intelligence. Genuine smiles – what psychologists call Duchenne smiles – engage the muscles around the eyes as well as the mouth. Forced smiles, the kind that come from “say cheese” or “look happy,” produce only mouth movement. The American Psychological Association cites research showing this distinction is visible and immediately legible to viewers. People feel the difference in a photograph even when they cannot name it.
To access genuine expressions, stop asking for them. Instead, give your subject a memory-based prompt: “Think about the last time you felt really proud of something.” Pause. Wait three seconds after they recall it. Then shoot. The expression that comes is not performed – it is recalled, and the eyes carry it.
Ask them about a person they love. Ask what they were doing last weekend that they actually enjoyed. Ask something that produces a real thought. Then capture the moment after they respond, not during it – the mouth closes into something truer than a smile.
Troubleshooting – fixing the most common portrait problems
Expressions look stiff or performative. The issue is usually proximity and instruction overload. Step back emotionally, simplify your direction to one physical note at a time, and use a memory prompt instead of asking for a facial expression. Give silence more space – many photographers fill every gap with chatter, which keeps subjects in social performance mode.
Skin looks plasticky in post. Over-smoothing is the most common editing mistake. Preserve visible pores. Use Lightroom’s Texture slider conservatively rather than reaching for the Smoothing or Healing brush first. A face with readable texture looks alive; one that has been over-processed reads as a mask. AI-assisted diffusion tools are emerging that can assist with texture-aware editing – but restraint remains the better instinct.
One side of the face always looks weaker. Most people have a preferred side – usually the one they unconsciously favour in selfies. Before shooting, ask your subject which side they prefer and start there. Build their confidence on the strong side, then introduce variety once they are relaxed.
The technical and the psychological are not separate skills in portrait photography – they are the same skill looked at from two angles. The forehead-forward technique only works if your subject trusts you enough to try it. The window light only sings if the expression in front of it is honest. Start with presence, build trust, control your light, direct the body with precision, and give the face a real feeling to carry. That is the work.
From here, study Yousuf Karsh, Annie Leibovitz, and Platon. Watch how each one uses the relationship with the subject as a compositional element – it is always visible in the final frame. Return to the lighting section and experiment with a single candle or a cracked door. Then keep going.
Frequently Asked Questions
Q: What focal length is best for portrait photography?
A: An 85mm lens is widely considered the most flattering choice for portraits because it requires greater camera-to-subject distance, which reduces barrel distortion and produces more accurate facial proportions. On a smartphone, use the 2x or 3x optical zoom rather than the default wide lens.
Q: How do you get genuine expressions in portrait photography?
A: Use memory-based prompts rather than facial instructions. Ask your subject to recall a specific moment – something they are proud of, or a person they love – then capture the expression two to three seconds after they respond. This triggers genuine emotional recall rather than performance mode, producing expressions where the eyes are visibly engaged.
Q: Does lighting really matter that much for portraits?
A: Yes – lighting direction fundamentally changes how a face reads. Side lighting creates shadow that defines facial structure and adds dimension, while flat frontal light removes depth. The goal is to control where shadows fall, not to eliminate them.
Q: How do I define the jawline in a portrait without editing?
A: Ask your subject to bring their forehead slightly forward and down toward the camera. The movement feels unnatural to them but tightens the skin beneath the chin and creates a sharper jawline. Show them a quick preview on your phone – most subjects immediately understand and repeat the adjustment.
Q: Can I shoot good portraits with a smartphone?
A: Yes. Use the telephoto lens (2x or 3x), position a natural side light source such as a window to one side of the subject, and focus on building rapport and directing expressions. The psychological and compositional elements of portrait photography are equipment-independent.
Source: https://furoore.com/portrait-photography/
This article was researched and written with AI assistance, then reviewed for accuracy and quality. Talulah Menser uses AI tools to help produce content faster while maintaining editorial standards.